In this tutorial, I will show you how to setup your gears and configure Neural Amp Modeler in standalone mode. If you are not certain what standalone mode is, please refer to my previous tutorial.
Gig Pedal: NAM 103 - Software Needed for Playing Guitars with Neural Amp Modeler
Please note this tutorial is for MAC users. If you use PC, please click the following link. It will take you to the tutorial for PC users.
NAM 104 - Configure Neural Amp Modeler in Standalone Mode (PC version)
1. Setup Gears
Hardware setup for Neural Amp Modeler
The above diagram shows you how to connect your gears together. The goal here is to connect Guitar, Computer and Speakers to the Audio Interface.
There are three steps to accomplish this job.
Step 1 Connect your guitar to the Audio Interface's Hi-Z Input or Instrument Input using a guitar cable.
Step 2 Use the appropriate data cable to connect your computer to your Audio Interface's USB port.
Step 3 Connect your monitors, speakers, or headphones to your audio interface's audio output using an audio cable.
There are numerous models of audio interfaces, making it impractical to list all the details for completing the above three steps. If you encounter any challenges, please refer to your audio interface's user manual for the required information.
2. Setup Neural Amp Modeler
In the previous section NAM 103 - Software Needed for Playing Guitars with Neural Amp Modeler, I provided information on downloading the installation package for Neural Amp Modeler. If you have not already done so, please install it on your computer now.
After starting up Neural Amp Modeler, please click NeuralAmpModeler menu then click Preferences. ↓
You will see the Preferences dialog box.↓
2.1 Setup Input Device in Neural Amp Modeler's Preferences Dialog Box
Neural Amp Modeler needs to know which Audio Interface is sending your guitar sound into the computer. Make sure to select the correct Audio Interface in "Input Device" drop-down list. I use a Focusrite Audio Interface, but yours may be different. ↓
2.2 Setup Output Device in Neural Amp Modeler's Preferences
Here we need to infom NAM what Audio Interface is connected to the speakers/headphones. After knowing this, NAM will be able to output the processed guitar sound so we can hear our play.
My speakers are connected to a Focusrite Audio Interface. Therefore, I am selecting Focusrite USB ASIO in the "Output Device" drop-down list. If you are using a different Audio Interface, your settings may differ from mine. ↓
2.3 Setup Sample Rate in Neural Amp Modeler's Preferences Dialog Box
In the digital audio realm, the sample rate determines the quality of the audio. A higher sample rate leads to improved sound quality. For example, CD music has a sample rate of 44.1kHz.
If you want to know more about sample rate, here is a good article about this topic.
Neural Amp Modeler works best at sampling rate 48000. Please choose this rate in the "Sampling Rate" drop-down list. This is shown in the following picture.
If you use sampling rate other than 48000, you will get a notice from NAM. ↓
This means NAM will still work for you. It just changes your sampling rate back to 48000 in operation. ↑
2.4 Setup Buffer Size in Neural Amp Modeler's Preferences Dialog Box
When jamming guitar with NAM, buffer size can alter the latency level you experience. If you set a larger buffer size in NAM, you'll experience a higher latency. However, if you decrease the buffer size, your computer will have a greater load. The smaller the buffer size, the heavier it will be on your computer. What buffer size should you use? It depends on your computer's power.
Try using 256 for now. When we finish setting up NAM, we will talk about this in the next section of this tutorial.
If you want to know more about buffer size settings, here is a good article about it.
2.5 Test if You Can Hear Your Guitar Sound
Up to this point, NAM should be smart enough to know how to work for you. Click the 'OK' button to close the Preferences Dialog Box and try strumming your guitar.
If you're hearing the guitar sound coming from both speakers, then well done - NAM setup is complete. Now let's move on to the next part of this tutorial and start jamming with NAM.
If you do not hear any sound but see the blue bars moving as you strum your guitar, it indicates that NAM is functioning correctly. Check if your speakers are turned on and the volume is set high enough to hear the sound.
If the blue bars are not in motion, please review the following checklist to identify any potential issues.
- Cable Check
- Guitar cable is correctly connected to Audio Interface's input port.
- USB cable is correctly connected to Audio Interface's USB port.
- USB cable is correctly connected to computer's USB port.
- Speakers/Headphones/Monitor are correctly connected to Audio Interface's output port.
- Audio Interface Input Chanel Check
- If your Audio Interface has more than one Input Chanel, make sure to activate the input channel to which your guitar is connected to.
- Volume Check
- Guitar Volume knob is not set to 0.
- Audio Interface output knob is not set to 0.
- Audio Interface input knob is not set to 0.
- Speakers/Headphones/Monitor volume knob is not set to 0.
- Power Check
- Speakers/Monitor/Headphones are powered up and turned on
- Audio Interface is powered up and turned on
If you're still unable to hear your guitar's sound even after reviewing all the items in the checklist above, then it's necessary to configure the Input/Output channels.
Please reopen your Preferences dialog box and continue to the next step of this tutorial. There are additional configurations that need to be addressed.
2.6 Setup Input Chanels in Neural Amp Modeler's Preferences Dialog Box
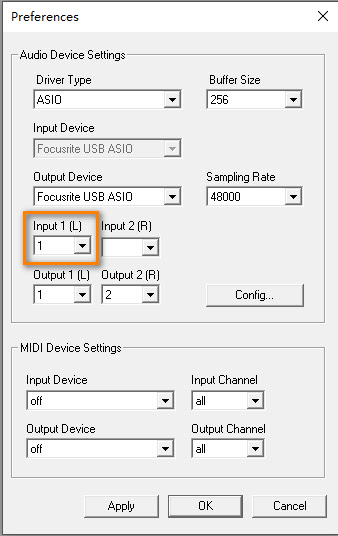
As shown from the image below, I have connected my guitar to Input Channel 1 of the Audio Interface. To inform Neural Amp Modeler about this, I need to configure it in Preferences. ↓
The following image demonstrates that Neural Amp Modeler features two input channels: Input 1(L) and Input 2(R). These are used by NAM to receive digital audio data from your Audio Interface. It's important to note that these are not physical channels, but rather software channels utilized for receiving digital data. ↓
2.7 Setup Output Chanels in Neural Amp Modeler's Preferences Dialog Box
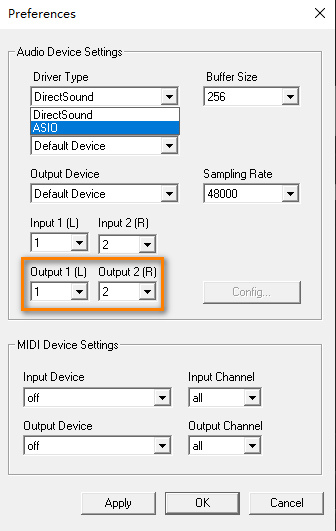
Neural Amp Modeler has two output channels: Output 1(L) and Output 2(R). Both of these two channels can output audio signal. This is shown in the following picture. ↓
My Audio Interface has two output channels. The left output Chanel is numbered 1. The right output Chanel is numbered 2. If I want to let Neural Amp Modeler know this, I need to set this up too. Here is what I did. ↓
Now we have finished all the settings, please click OK button to close the Preferences Dialog Box and strum your guitar.
If you can hear guitar sound from both speakers, congratulations, you have finished setting up NAM. Now please proceed to the next section of this tutorial. We can finally jam with NAM now.
If you don't hear any sound but you can see the blue bars going up and down as you strum your guitar, that means NAM is now working. Please check if you have turned on your spankers and the volume is not set too low to hear.
You may have noticed there is Midi Device Settings in the Preferences dialog box. Midi settings will be talked about later.


