Before start reading this article, please note that this document is tailored for Apple Mac users. If you are using Windows computers, please refer to the following article:
NAM 107- Set up Reaper DAW to use Neural Amp Modeler as an audio plugin (Windows Version)
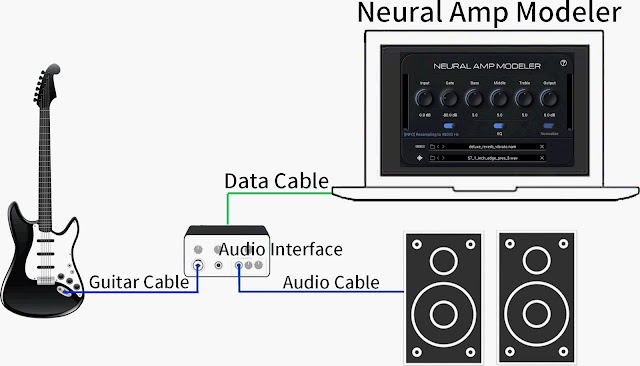
Set Up Gears
 |
Hardware setup for playing guitar in Reaper DAW. |
Install Reaper DAW
If you have not Installed Reaper DAW on your computer, please visit the official Reaper website at https://www.reaper.fm/download.php and download the version of Reaper Installer that corresponds to your operating system.
Once the download is complete, run the installer file to begin the installation process. The installer will guide you through the installation process. Follow the on-screen instructions to set up Reaper on your computer.
Once the installation process is complete, locate the Reaper icon on your desktop or in your applications folder and double-click it to launch the software.
Set Up Audio Interface in Reaper DAW
To use Neural Amp Modeler as an audio plugin, the first step is configuring Reaper for our audio interface. This is very similar to how we configured NAM in standalone mode Here's a step-by-step guide:
1 Connect your Audio Interface:
- Ensure that your audio interface is connected to your computer.
- Connect your guitar to the input on your audio interface.
- Connect your speakers or headphones to the output of your audio interface.
2 Install Drivers:
Before you start using your audio interface with Reaper, make sure you've installed the necessary drivers. These drivers often come with the audio interface or can be downloaded from the manufacturer's website.
3 Open Reaper:
Launch Reaper on your computer.
4 Access Preferences:
Go to "Options" in the top menu and select "Preferences" at the very bottom. You could also use the keyboard shortcut "Command +,". This will open up the Preferences window as shown in the following image. ↓
 |
| Reaper Preferences Window on MAC computer |
5 Select Audio Device:
In the Preferences window, click on the "Device" tab on the left. This is shown in the following image. ↓
 |
| Reaper Audio Device Settings on MAC Computer.png |
6 Choose Audio Device:
In the "Audio Device Settings" section, select your audio interface from the drop-down menu. This is to inform Reaper which Audio Interface is sending your guitar sound into the computer. Make sure to select the correct Audio Interface in "Audio Device" drop-down list. I use a Focusrite Audio Interface, but yours may be different. ↓
 |
| Reaper Audio Device Settings on MAC Computer |
7 Set the Sample Rate:
Neural Amp Modeler works best at sampling rate 48000. Please use 48000 as sample rate. This is shown in the following picture. ↓
 |
| Reaper Sample Rate Settings on MAC Computer |
Please note that I provided a more detailed explanation regarding sample rate and the consequences of not setting it to 48000 in my earlier tutorial NAM 104 - Configure Neural Amp Modeler in Standalone Mode (PC version).
8 Set the buffer size:
When jamming guitar with NAM, buffer size can alter the latency level you experience. If you set a larger buffer size in NAM, you'll experience a higher latency. However, if you decrease the buffer size, your computer will have a greater load. The smaller the buffer size, the heavier it will be on your computer. What buffer size should you use? It depends on your computer's power.
Try using 512 as the sample rate for now. And we can adjust it later when using DAW and NAM to play guitar.
 |
| Reaper Buffer Size Settings on MAC Compute |
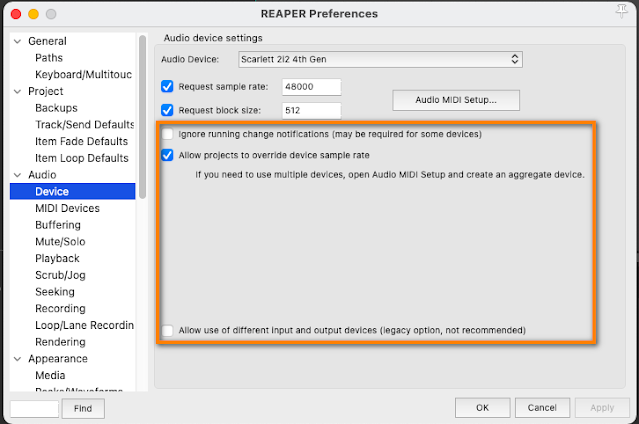
11 Keep the remaining settings as default.
The remaining options we haven't discussed are beyond the scope of this article. To be honest, in my experience of using Reaper, I've never found the need to change them from their default settings. Therefore, I would suggest not worrying about these options.
 |
| Keep Remaining Reaper Audio Device Settings on MAC as default. |
12 Apply and Close:
Click "Apply" and then "OK" to save your preferences.
Now we have finished setting up Reaper. In the next tutorial, I will show you how to activate Neural Amp Modeler in DAW and play guitar with Reaper.